1. 문제


6. BaseArray 클래스를 상속받아 스택으로 작동하는 MyStack 클래스를 작성하라.


2. 결과


3. 코드


#include <iostream>
#include <string>
using namespace std;

class BaseArray {
	int capacity;
	int *mem;
protected : 
	BaseArray(int capacity=100) {
		this->capacity = capacity; mem = new int [capacity];
	}
	~BaseArray() { delete [] mem; }
	void put(int index, int val) { mem[index] = val; }
	int get(int index) { return mem[index]; }
	int getCapacity() { return capacity; }
};

class MyStack : public BaseArray {
	int top;
public :
	MyStack(int size) : BaseArray(size){ top=0; }
	void push(int n){ put( top, n); top++; }
	int capacity() { return getCapacity(); }
	int length() { return top; }
	int pop() { top--; return get(top); }
};

int main() {
	MyStack mStack(100);
	int n;
	cout << "스택에 삽입할 5개의 정수를 입력하라>> ";
	for(int i=0; i<5; i++) {
		cin >> n;
		mStack.push(n);
	}
	cout << "스택용량:" << mStack.capacity() << ", 스택크기:" << mStack.length() << endl;
	cout << "스택의 모든 원소를 팝하여 출력한다>> ";
	while(mStack.length() != 0 ) {
		cout << mStack.pop() << ' ';
	}
	cout << endl << "스택의 현재 크기 : " << mStack.length() << endl;
}


4. 설명


 스택은 후입선출의 구조로서 나중에 들어간 데이터가 가장 먼저 나오는 구조 입니다.


앞서 구현하였더 Queue와 달리 Stack은 가장 꼭대기를 가리키는 top 멤버 변수 하나를 이용하여서 데이터를 삽입하거나 삭제 합니다.


 후입선출의 구조이므로 삽입할 시 top++;을 해주고 삭제 시 top--;를 해주면 됩니다.


※ 이미지가 잘못되었는데 귀찮아서 수정하지 않았습니다. 결과는 알맞게 나오도록 코드는 수정하였으니 문제 없습니다.


문제 5~6에 적용되는 BaseArray 클래스는 다음과 같다.


1. 문제


5. BaseArray를 상속받아 큐처럼 작동하는 MyQueue 클래스를 작성하라. MyQueue를 활용하는 사례는 다음과 같다.


2. 결과


3. 코드


#include <iostream>
#include <string>
using namespace std;

class BaseArray {
	int capacity;
	int *mem;
protected : 
	BaseArray(int capacity=100) {
		this->capacity = capacity; mem = new int [capacity];
	}
	~BaseArray() { delete [] mem; }
	void put(int index, int val) { mem[index] = val; }
	int get(int index) { return mem[index]; }
	int getCapacity() { return capacity; }
};

class MyQueue : public BaseArray {
	int enindex;
	int deindex;
public :
	MyQueue(int size) : BaseArray(size){ enindex=0; deindex=-1; }
	void enqueue(int n){ put( enindex, n);
								enindex++; }
	int capacity() { return getCapacity(); }
	int length() { return enindex; }
	int dequeue() { enindex--;
					deindex++; return get(deindex); }
};

int main() {
	MyQueue mQ(100);
	int n;
	cout << "큐에 삽입할 5개의 정수를 입력하라>> ";
	for(int i=0; i<5; i++) {
		cin >> n;
		mQ.enqueue(n);
	}
	cout << "큐의 용량:" << mQ.capacity() << ", 큐의 크기:" << mQ.length() << endl;
	cout << "큐의 원소를 순서대로 제거하여 출력한다>> ";
	while(mQ.length() != 0 ) {
		cout << mQ.dequeue() << ' ';
	}
	cout << endl << "큐의 현재 크기 : " << mQ.length() << endl;
}


4. 설명


 큐는 선입선출의 구조로서 가장 먼저 들어간 데이터가 가장 먼저 나오는 구조 입니다.


BaseArray 클래스의 생성자는 입력받는 매개변수 값만큼 동적으로 배열을 생성합니다.


 MyQueue 클래스의 생성자에서는 : BaseArray( size )를 해 주어서 BaseArray의 매개변수 있는 생성자가 실행되도록 합니다.


MyQueue 클래스는 2개의 멤버 변수를 가지는데 하나는 삽입할 위치에 인덱스 번호를, 또 다른 하나는 삭제할 요소의 인덱스 번호를 저장합니다.


1. 문제


4. 다음 main() 함수가 실행되도록 Point 클래스를 상속받는 ColorPoint 클래스를 작성하고, 전체 프로그램을 완성하라.


2. 결과


3. 코드


#include <iostream>
#include <string>
using namespace std;

class Point {
	int x, y;
public :
	Point(int x, int y) { this->x = x; this->y = y; }
	int getX() { return x; }
	int getY() { return y; }
protected :
	void move(int x, int y) { this->x = x; this->y = y; }
};

class ColorPoint : public Point {
	string name;
public :
	ColorPoint(int x=0, int y=0, string name="BLACK") : Point(x, y) {
		this->name = name; }
	void setPoint(int x, int y){ move(x, y); }
	void setColor(string name) { this->name = name; }
	void show() { cout << name << "색으로 (" << getX() << "," << getY() << ")에 위치한 점입니다." << endl; }
};

int main() {
	ColorPoint zeroPoint;
	zeroPoint.show();

	ColorPoint cp(5, 5);
	cp.setPoint(10, 20);
	cp.setColor("BLUE");
	cp.show();
}


4. 설명


 매개변수가 없는 ColorPoint 클래스 변수를 생성하기 위해서는 디폴트 매개변수를 가진 생성자로 작성 합니다.


매개변수 없이 선언된 변수 zeroPoint의 결과를 보았을 때 (0, 0) "BLACK" 으로 각각 디폴트 매개변수를 줍니다.


추가적으로 setPoint, setColor, show 멤버 함수를 작성하여 줍니다.


문제 3~4에 적용되는 2차원 상의 한 점을 표현하는 Point 클래스가 있다.


1. 문제


3. 다음 main() 함수가 실행되도록 Point 클래스를 상속받은 ColorPoint 클래스를 작성하고, 전체 프로그램을 완성하라.


2. 결과


3. 코드


#include <iostream>
#include <string>
using namespace std;

class Point {
	int x, y;
public :
	Point(int x, int y) { this->x = x; this->y = y; }
	int getX() { return x; }
	int getY() { return y; }
protected :
	void move(int x, int y) { this->x = x; this->y = y; }
};

class ColorPoint : public Point {
	string name;
public :
	ColorPoint(int x, int y, string name) : Point(x, y) {
		this->name = name; }
	void setPoint(int x, int y){ move(x, y); }
	void setColor(string name) { this->name = name; }
	void show() { cout << name << "색으로 (" << getX() << "," << getY() << ")에 위치한 점입니다." << endl; }
};

int main() {
	ColorPoint cp(5, 5, "RED");
	cp.setPoint(10, 20);
	cp.setColor("BLUE");
	cp.show();
}


4. 설명


 Point 클래스를 상속받은 ColorPoint 클래스를 작성합니다.


ColorPoint 클래스는 추가적으로 색을 입력 받으므로 string 변수 name을 선언합니다.


: Point( x, y) 를 추가하여서 Point클래스에서 Point( int x, int y) 생성자가 실행되도록 만들어 줍니다.


추가적으로 위치를 재설정하는 setPoint 멤버함수와 , 색을 재설정하는 setColor 멤버함수, show 멤버 함수를 작성합니다.


1. 문제


2. 다음과 같이 배열을 선언하여 다음 실행 결과가 나오도록 Circle을 상속받은 NamedCircle 클래스와 main() 함수 등 필요한 함수를 작성하라.


2. 결과


3. 코드


#include <iostream>
#include <string>
using namespace std;

class Circle {
	int radius;
public :
	Circle(int radius=0) { this->radius = radius; }
	int getRadius() { return radius; }
	void setRadius(int radius) { this->radius = radius; }
	double getArea() { return 3.14*radius*radius; }
};

class NamedCircle : public Circle {
	string name;
public :
	NamedCircle(int radius=0, string name="") : Circle( radius ) {
		this->name = name;
	}
	void setRName(int r, string name) { setRadius(r); this->name = name; }
	string getName() { return name; }
};

int main() {

	NamedCircle pizza[5];
	int i,r; string name;

	cout << "5 개의 정수 반지름과 원의 이름을 입력하세요" << endl;
	for( i=0; i<5; i++) {
		cout << i+1 << ">> ";
		cin >> r >> name;
		pizza[i].setRName( r, name);
	}

	double max = pizza[0].getArea();
	name = pizza[0].getName();
	for( i=1;i<5; i++) {
		if( pizza[i].getArea() > max ) { 
			max = pizza[i].getArea();
			name = pizza[i].getName();
		}
	}
	cout << "가장 면적이 큰 피자는 " << name << "입니다" << endl;
}


4. 설명


 NamedCircle 클래스 배열 변수를 선언하기 위해서는 디폴트 매개변수를 가지고 있는 생성자를 작성해야 합니다.


그냥 초기 값 같은 것이므로 편한대로 0와 ""으로 디폴트 매개변수를 주었습니다.


그 후 setRName 멤버 함수를 이용하여서 입력 받은 반지름과 원의 이름을 각각 저장합니다.


문제 1~2에 적용되는 원을 추상화한 Circle 클래스가 있다.


1. 문제


1. 다음 코드가 실행되도록 Circle을 상속받은 NameCircle 클래스를 작성하고 전체 프로그램을 완성하라.


2. 결과


3. 코드


#include <iostream>
#include <string>
using namespace std;

class Circle {
	int radius;
public :
	Circle(int radius=0) { this->radius = radius; }
	int getRadius() { return radius; }
	void setRadius(int radius) { this->radius = radius; }
	double getArea() { return 3.14*radius*radius; }
};

class NamedCircle : protected Circle {
	string name;
public :
	NamedCircle(int radius, string name) : Circle( radius ) {
		this->name = name;
	}
	void show() { cout << "반지름이 " << getRadius() << "인 " << name << endl; }
};

int main() {
	NamedCircle waffle(3, "waffle" );
	waffle.show();
}


4. 설명


Circle 클래스를 상속받은 NamedCircle 클래스를 작성합니다.


NamedCircle 클래스는 원의 이름을 저장하는 string 변수 name을 가집니다.


생성자를 보면 보통 생성자를 작성할 때와 달리 ": Circle( radius )" 가 추가되어 있습니다.


이것은 부모 클래스의 생성자 Circle( int radius )를 실행하도록 합니다. 


만약 이 문장이 추가되지 않았을 시 Circle 클래스의 기본 생성자를 가리키게 되어서, NamedCircle 생성자에 있는 매개변수 radius의 어떤 값이 입력되어도 radius의 값은 0이 되어 버립니다.


이전 '안드로이드 DB(데이터베이스) 생성'

2019/04/21 - [Android] - 안드로이드 DB(데이터베이스) 생성


글에서 SQLiteOpenHelper를 상속받는 클래스 속 onUpgrade() 메소드의 관하여 알아보겠다.


/* DBHelper.java */

package com.tistory.godog.dbtest;

import android.content.Context;
import android.database.sqlite.SQLiteDatabase;
import android.database.sqlite.SQLiteOpenHelper;

public class DBHelper extends SQLiteOpenHelper {

    static final String DATABASE_NAME = "test.db";
    //static final int DATABASE_VERSION = 2;

    public DBHelper(Context context, int version) {
        super(context, DATABASE_NAME, null, version);
    }
/*
    public DBHelper(Context context, String name, SQLiteDatabase.CursorFactory factory, int version) {
        super(context, name, factory, version);
    }
*/

    @Override
    public void onCreate(SQLiteDatabase db) {
        db.execSQL("CREATE TABLE tableName ( name TEXT, info TEXT);");
    }

    @Override
    public void onUpgrade(SQLiteDatabase db, int oldVersion, int newVersion) {
        db.execSQL("DROP TABLE IF EXISTS tableName");
        onCreate(db);
    }

}


- onUpgrade()는 생성자에서 버전을 업그레이드하면 실행된다.


- 버전을 높일 때는 보통 db에 새로운 열 테이블을 추가하거나 변경 사항이 있을 때이므로 기존의 테이블은 삭제해준 후 다시 생성하여야 한다.


ex) 만약 위 프로그램을 한번 실행한 후 db파일이 생성되었으면 그 후 다시 실행하였을 때는 db파일이 있으므로 onCreate가 실행되지 않는다. 

 그러므로 한번 실행 후 onCreate에서 INTEGER인 열을 하나 추가하고 다시 실행하여도 테이블은 변하지 않는다.

 하지만 이 때 버전을 더 높은값(업그레이드)을 준다면 다시 onUpgrade가 실행되어 기존의 테이블을 지운 후 onCreate를 실행하여서 새로운 테이블을 생성하도록 만든다.


- 이 때 주의할 점은 기존의 테이블은 삭제한 후 새로운 테이블은 만드는 것이므로 기존 테이블의 데이터는 다 삭제가 된다.

 그러므로 기존의 데이터를 보존하고 싶다면 테이블을 삭제하기 전 데이터들을 저장하고, 테이블을 다시 만든 후 값들을 다시 저장해주면 된다.


안드로이드 DB(데이터베이스)를 사용하는 방법을 알아 보겠슴다.


데이터베이스를 이용하는 곳이 많은 만큼 중요한 것이고, 가독성을 높이기 위해서 여러 글로 나누어서 작성하려고 합니다.


우선은 안드로이드 DB(데이터베이스) 1편  'DB 생성'입니다.
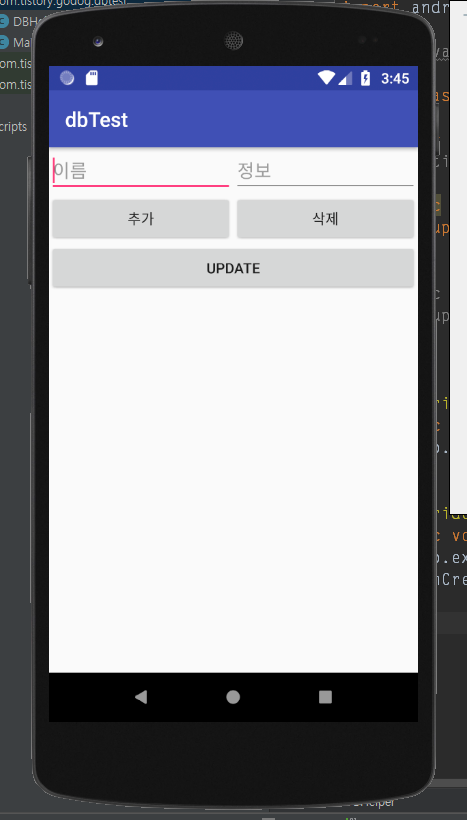


실행 화면


/* 메인 레이아웃(activity_main.xml) */

<?xml version="1.0" encoding="utf-8"?>
<LinearLayout xmlns:android="http://schemas.android.com/apk/res/android"
    android:layout_width="match_parent"
    android:layout_height="match_parent"
    android:orientation="vertical">
    
    <LinearLayout
        android:layout_width="match_parent"
        android:layout_height="wrap_content"
        android:orientation="horizontal">

        <EditText
            android:id="@+id/editText"
            android:layout_width="wrap_content"
            android:layout_height="wrap_content"
            android:layout_weight="1"
            android:ems="10"
            android:hint="이름"
            android:inputType="textPersonName" />

        <EditText
            android:id="@+id/editText2"
            android:layout_width="wrap_content"
            android:layout_height="wrap_content"
            android:layout_weight="1"
            android:ems="10"
            android:hint="정보"
            android:inputType="textPersonName" />
    </LinearLayout>

    <LinearLayout
        android:layout_width="match_parent"
        android:layout_height="wrap_content"
        android:orientation="horizontal">

        <Button
            android:id="@+id/button"
            android:layout_width="match_parent"
            android:layout_height="wrap_content"
            android:layout_weight="1"
            android:onClick="insert"
            android:text="추가" />

        <Button
            android:id="@+id/button2"
            android:layout_width="match_parent"
            android:layout_height="wrap_content"
            android:layout_weight="1"
            android:onClick="delete"
            android:text="삭제" />
    </LinearLayout>

    <Button
        android:id="@+id/button3"
        android:layout_width="match_parent"
        android:layout_height="wrap_content"
        android:onClick="listUpdate"
        android:text="Update" />

    <LinearLayout
        android:layout_width="match_parent"
        android:layout_height="match_parent"
        android:orientation="horizontal">

        <ListView
            android:id="@+id/listView"
            android:layout_width="match_parent"
            android:layout_height="match_parent"
            android:layout_weight="1">


        </ListView>

        <ListView
            android:id="@+id/listView2"
            android:layout_width="match_parent"
            android:layout_height="match_parent"
            android:layout_weight="1" />
    </LinearLayout>

</LinearLayout>


주 내용은 데이터베이스이므로 대충 그냥 리스트뷰를 2개 사용하여서 각각 출력하도록 만들었다.


하지만 데이터베이스를 사용할 때 보통 같이 쓰는 것 중 하나가 바로 커스텀 리스트 뷰인데 이에 관하여서는

2019/04/14 - [Android] - 안드로이드 리사이클 러뷰(RecyclerView) (1)


해당 글을 참조하여서 만들어보는 것을 추천한다.


/* 메인 자바 코드 ( MainActivity.java ) */

package com.tistory.godog.dbtest;

import android.database.Cursor;
import android.database.sqlite.SQLiteDatabase;
import android.support.v7.app.AppCompatActivity;
import android.os.Bundle;
import android.view.View;
import android.widget.ArrayAdapter;
import android.widget.EditText;
import android.widget.ListView;
import android.widget.Toast;

public class MainActivity extends AppCompatActivity {

    EditText editText, editText2;
    ListView listView, listView2;

    DBHelper dbHelper;
    SQLiteDatabase db = null;
    Cursor cursor;
    ArrayAdapter adapter, adapter2;

    @Override
    protected void onCreate(Bundle savedInstanceState) {
        super.onCreate(savedInstanceState);
        setContentView(R.layout.activity_main);

        editText = findViewById(R.id.editText);
        editText2 = findViewById(R.id.editText2);
        listView = findViewById(R.id.listView);
        listView2 = findViewById(R.id.listView2);

        dbHelper = new DBHelper(this, 3);
        db = dbHelper.getWritableDatabase();    // 읽기/쓰기 모드로 데이터베이스를 오픈


    }

}


- 우선은 데이터베이스 생성만을 알아보는 것이므로 메인에서는 변수 선언과 초기화 말고 별거 없다.


- 18라인 : 만들어야 할 클래스 파일.


- 19라인 : SQLiteDatabase에는 SQL 명령을 생성, 삭제, 실행하고 기타 일반적인 데이터베이스 관리 작업을 수행하는 메소들이 있다.


- 20라인 : Cursor는 안드로이드에서 DB에서 가져온 데이터를 쉽게 처리하기 위해서 제공하는 2차원 테이블을 가지는 인터페이스이다.


이제 18라인에서 만들어야 한다고 했던 자바 파일을 만들기 위해서 자바 파일만을 하나 생성해준다.

/* DBHelper.java */

package com.tistory.godog.dbtest;

import android.content.Context;
import android.database.sqlite.SQLiteDatabase;
import android.database.sqlite.SQLiteOpenHelper;

public class DBHelper extends SQLiteOpenHelper {

    static final String DATABASE_NAME = "test.db";
    //static final int DATABASE_VERSION = 2;

    public DBHelper(Context context, int version) {
        super(context, DATABASE_NAME, null, version);
    }
/*
    public DBHelper(Context context, String name, SQLiteDatabase.CursorFactory factory, int version) {
        super(context, name, factory, version);
    }
*/

    @Override
    public void onCreate(SQLiteDatabase db) {
        db.execSQL("CREATE TABLE tableName ( name TEXT, info TEXT);");
    }

    @Override
    public void onUpgrade(SQLiteDatabase db, int oldVersion, int newVersion) {
        db.execSQL("DROP TABLE IF EXISTS tableName");
        onCreate(db);
    }

}


- 파일을 생성하였으면 SQLiteOpenHelper를 상속받아준다.


- SQLiteOpenHelper는 데이터베이스 생성 및 버전 관리를 관리하도록 도와주는 클래스이다.


+ 상속을 받아준 후 클래스 안에서 "Ctrl+i"를 눌러서 모두 추가해 준 후,

 "Alt + Insert"->"Constructor"로 생성자 하나를 추가해주면 기본적인 세팅은 끝난다.


- 주석된 부분을 보면 본래 생성자를 볼 수 있다. 이는 선언한 생성자와 많이 매개변수가 다른데 별 의미는 없다. 단, 데이터베이스 파일을 하나만 사용할 경우 위처럼 상수로 데이터베이스 이름과 버전을 선언해두고 인수로 줌으로써 에러를 줄이고 수정을 용이하게 만든다.

(+ 보통 파일 내에서 테이블 단위로 나눌 수 있으므로 db파일을 하나만 사용한다. )


- onCreate : 데이터베이스가 처음 생성될 때 호출된다. 그러므로 테이블의 생성이 일어난다.


※ execSQL :  Select 명령 외에 SQL 명령들을 실행한다. 


- 23라인 :  괄호 안을 보면 ( name TEXT, info TEXT)로 되어있다. 이는 ( '열 항목명' '데이터 형', )이다. 숫자 데이터 형을 만들려면 "(num INTEGER)" 이렇게 만들면 된다.


- onUpgrade

2019/04/21 - [Android] - 안드로이드 DB(데이터베이스) onUpgrade


여기까지 데이터베이스 생성 및 관리를 도와주는 SQLiteOpenHelper를 상속받은 클래스 파일을 만들었으면 데이터베이스를 만들 준비는 끝났다.


다음 글에서는 이어서 데이터베이스의 데이터를 추가, 삭제하는 방법을 알아보겠다.


+ Recent posts